Game Input System in Swift
Build a rock solid and reusable game input system in Swift. It works with all of Apple's game frameworks and is device agnostic.


Handling player input can be disproportionally difficult. One could think writing complex game algorithms would be the biggest challenge when it comes to game development. Writing an input system that can handle anything from touch to game controllers, mouse and keyboards combined with different devices and operating systems can be a whole mess of edge cases, gray hair, and trial and error.
I decided to come up with a system once and for all that I could simply drop in to new game projects together with a configuration for how I want the input to work for that game, and then be done with it.
These are the goals I wanted to achieve with the input system.
- Completely decoupled from the game code.
- Highly reusable, preferably a separate package.
- Handle any kind of input device or screen.
- Work for both UI and Gameplay.
- Game code should not depend on which input is currently being used.
- Handle game controllers with relevant related events.
- Not be tied to a specific game framework.
- Have a "swifty" feel when configuring a game's input.
- Layout system to define touch input virtual controller.
- Apply custom artwork for thumbsticks and buttons in the virtual controller.
We want to achieve a system that under the hood takes care of all the input handling and completely abstracts it away from the game.
That is an end to switch or if conditions that checks for keypresses, mouse buttons, touch input and other devices wired up in the actual game code. It should also automatically handle game controller detection and all related events.
And of course, we are also going to want to ensure that the input system handles everything required to have the Game Controllers supported badge in Apple's App Store.
Game Input Actions
After trying some different concepts and ideas, I ended up going with an action-based approach. The concept is that the game polls or listens to actions instead of directly having to check for device input.
Examples of actions can be "Jump" or "Move". The game only has to care about if a "Jump" action happened, and does not need to know what button or device that triggered the action to happen.
The game defines a list of actions it needs for its gameplay and then the input system generates the actions for the game.
When setting up a new game, each device the game supports is configured how it triggers the actions in the appropriate way for that kind of device.
Once implemented, I've found this to be a solid approach for a highly decoupled system that ends up with very clean and easy maintainable code when used in a game project.
Game Input Groups
With the concept of Input Actions for a game, we have immediately solved many of the initial list of bullet points that I wanted to achieve.
We have decoupled the input code from the game code so it can be reused and not tied specifically to a certain game framework. As the game only cares about actions, it does no longer depend on which device is currently generating the input.
Next, we want to solve different input scenarios. A thumbstick or a D-pad on a game controller might need to be associated with more than one action. During gameplay it is associated with a "Move" action, while when we are displaying a UI to the player we want it to be associated with a "Navigation" action.
This is the requirement that the system should work for both the UI and Gameplay. We handle that by introducing Input Groups.
Each action will belong to a group, and only one group can be active at a time. And by switching which input group that is currently active, we can immediately change the input behavior of the game.
We can have one group of actions for the UI and one group of actions for the gameplay. Then we can simply switch between the UI and Gameplay groups depending on which state the game is in.
I like to use an approach where I have a finite state machine that tracks the
overall game state. By default I set the input system to UI and then I use the
enter and exit transitions for my Gameplay state to change the input group. Whenever
the game enters GameplayState I enable the Gameplay input group and whenever
it exits GameplayState I enable the UI input group.
Configure the Input System
Now we have an idea of how the input system should work. Now it's time to deal with the "Swifty" configuration. It was very important for me to come up with an API that I felt comfortable with. Maybe one of the most important aspects of the system, as I wanted it to feel logical and easy to setup the input for each new game.
I decided on using one struct, InputConfig, that I will add to each game and this
strict will hold the entire input configuration for the game by binding devices
with actions.
So during the game's initialization, preferably when my GameManager starts up, I'll
simply have to create the config, and then the game is ready to use the actions.
final class GameManager {
  init() {
    // Configure input mapping.
    InputConfig()
  }
}
We'll keep it simple, all right.
Then let's take a look at how we define the struct with all the game input mappings. I start by defining the input groups and input actions the game will use.
/// Registers all input actions for the game.
struct InputConfig {
  // `Input Group` identifiers.
  static let gameplay: String = "Gameplay"
  static let ui: String = "UI"

  // `Input Action` identifiers.
  static let moveAction = "move"
  static let fireAction = "fire"
  static let jumpAction = "jump"
  static let pauseAction = "pause"

  static let menuNavigate = "menu navigate"
  static let menuSelect = "menu select"
  static let menuExit = "menu exit"

  #if DEBUG
  static let debugKill = "debug kill"
  static let debugNextLevel = "debug next level"
  static let debugDropItem = "debug drop item"
  #endif
}
I initially wanted to be able to use an enum for the identifiers, but I couldn't
come up with a solid solution when the config also needs to be accessible and
parsed by the separate input package. By using static let we
overcome that while still being able to reference them by dot syntax, so we can
for instance listen to .moveAction.
In the above example we define two groups that we are going to use, then four
different gameplay actions, three UI actions, and finally some additional actions
only included in DEBUG builds that can be useful during play testing.
This covers everything this example game is supposed to be able to do.
Up next, we are going to map our actions to different devices. Let's check out the
.moveAction bindings.
let moveAction = InputAction(name: Self.moveAction, type: .stick, bindings: [
    GamepadBinding(.leftStick),
    CompositeKeyBinding(keySet: .wasd)
])
InputAction is a core class of my game input system and it does most of the
heavy lifting to be the bridge between the game and the input devices. So the
InputAction takes three parameters; we need an identifier, a type, and the bindings.
By identifying it with the static let name we defined earlier, we get an association
between the input action and that name, so we later on always can refer to it with
.moveAction syntax. Then we need to let the action know what kind of input control
this is.
I've added four different types of control to my InputAction class at this time.
.stick: A analog stick control like the thumbsticks on gamepads..button: A button expressed as a floating-point value..d-pad: A digital button control like the D-pad on gamepads..cursor: A position on the screen like a mouse pointer or Apple Pencil.
Then we have the bindings, which I provide as an array. In this example I
provide bindings for Game controllers and keyboards. Each binding type adopts to
an InputBinding protocol and has its own custom set of possible controller elements relevant
for that device binding.
The GamepadBinding has elements like .leftStick, .rightStick, .buttonNorth
and so on.
While the keyboard has bindings for different keys like p or shift. For
convenience I added a CompositeKeyBinding on top of KeyBinding as I found myself
often needing that setup. So above I use a composite key binding and pass in the
.wasd keys.
And of course, as it is an array, we can use multiple bindings from the same
device type for one action. So to expand on the .moveAction.
let moveAction = InputAction(name: Self.moveAction, type: .stick, bindings: [
  GamepadBinding(.leftStick),
  CompositeKeyBinding(keySet: .wasd),
  CompositeKeyBinding(keySet: .cursor)
])
We now have a second composite binding with the cursor keys, so the player can
use any of those keys, according to what they prefer. I use this in other places
too, like the .pauseAction.
let pauseAction = InputAction(name: Self.pauseAction, type: .button, bindings: [
  GamepadBinding(.buttonMenu),
  KeyBinding(key: "p"),
  KeyBinding(key: Character(UnicodeScalar(0x1b)))
])
Here we assign pause to both the p key and to the esc key.
Another example with multiple bindings would be the UI navigation.
let navigateAction = InputAction(name: Self.menuNavigate, type: .dpad, bindings: [
  GamepadBinding(.leftStick),
  GamepadBinding(.dpad),
  CompositeKeyBinding(keySet: .wasd),
  CompositeKeyBinding(keySet: .cursor)
])
Here we are giving the player four different options that all work at the same time to navigate the game's menu screens. And the system also handles using an analog left thumb stick as a directional pad input type, like in this case.
With all the different actions for the game configured, all that remains is to group them.
// Assign the actions to an input group.
Input.shared.add(inputGroup:
  InputGroup(name: Self.gameplay, actions: [
    moveAction,
    jumpAction,
    fireAction,
    pauseAction
  ])
)
The input system is at its core a singleton, so we easily can access it without having to create an instance. We use that to our advantage, so when the configuration adds its groups to the input system, the system gets automatically initialized and brought alive to start listening for input and invoking actions.
The game does not need to track an instance of its own for input handling. Setting up the config is all the game needs to do.
Handling Touch Input
In the previous example I didn't touch on the subject of assigning any bindings for touch controls, no pun intended.
Binding actions to touch controllers works just the same. In the most basic setup, using the built-in default flat shapes as art, it would be added exactly like any other binding, with the addition of positioning the button on screen.
let fireAction = InputAction(name: Self.fireAction, type: .button, bindings: [
  TouchButtonBinding(
    position: Position(
        horizontal: .right,
        vertical: .bottom
    )
  )
])
While this works and the layout system takes things like margins and safe area into account, it's still too limited. I want to be able to make much more custom layouts with custom artwork.
In a real scenario, I need a setup more like this, which is a controller from a game I'm currently working on.
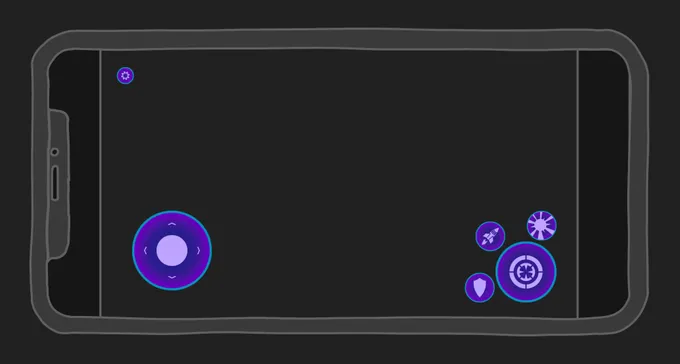
To make a layout like this happen, the TouchInputBinding struct have quite a few
more parameters than the keyboard and mouse have.
Setting up the previous devices has turned out to be quite a nice and neat piece of configuration code that is easy to overview. I didn't want to visually pollute the code with the touch bindings. So I added a method where I can add more bindings to an existing input action.
By that I can make a choice, if I want to add the touch input bindings together with the other devices, or tag them on separately at the end. So far I've always tagged them on separately, so I can deal with layout, art, and so on in the same location.
So in reality, when I do a full layout the configuration for a touch element will need an artwork reference, position, and size.
// Size shared by all buttons.
static let buttonSize = CGSize(width: 32, height: 32)

// Setup the texture reference
let fireButtonGlyph = TouchControllerTexture(
  name: "Fire Button", size: buttonSize,
  asset: .image(named: "Fire Button"))

  // Add the binding to an existing action.
  fireAction.add(
    binding: TouchButtonBinding(
      position: Position(
        horizontal: .right(buttonSize.width / 2),
        vertical: .top(buttonSize.height / 2)),
      button: TouchButton(
        symbol: fireButtonGlyph,
        background: TouchControllerTexture(
            name: "", size: .zero, asset: .none),
        pressedColor: .white
  )))
The layout system still has room for improvements and is not yet as sophisticated as it could be. On the top of my list is to add a rule system so one element can be placed in relation to another element, and specify a vector with an offset.
That would make tweaking and rearranging the layout much easier. But for now I've got by with these options where I can set the major screen location and then tweak that position that can take an additional adjustment value.
Every touch element can take a background texture, which I in this example do not use, as the element provided its own.
Once all elements are registered with the system, all assets are combined into one single texture in memory during runtime to reduce draw calls and batching for optimal performance.
Using the Input System in a Game
With the configuration done it's time to use the actions in our game. This is where we get rewarded. Not only is it easy to use the actions from this point on, we can also remap actions to new buttons or add new bindings without having to touch any of the game code.
I prefer to use patterns in the line of delegates, so we are listening for events and don't do any kind of processing until an event actually occurs.
In opposite to a polling system where we need to do some tiny processing on each update loop to see if an event has occurred.
I implemented both options in the input system as I find them both useful for different reasons. I want to listen to the action event once I'm done implementing an input-dependent feature. At the same time, I find it convenient to have a polling option when I just quickly want to test something without having to add code for delegates or listen to an event.
I also added support for analog events on everything. So I can always choose if I want to get a digital value or an analog value. That is, I can get a value that the button was pressed, or if needed I can also get the value of how hard the button was pressed.
Taking the .button input type as an example, we've 3 possible states to query about.
triggered: Triggered is set on the frame, the button is pressed down.released: Released is set on the frame, the button is released.value: Value always holds the value of how much the button is pressed down, in the 0.0 - 1.0 range.
Polling for Input Actions
Let's start by looking at an example where we poll an input action for an event.
class InputComponent: Component {
  let fireAction = Input.shared.getAction(map: InputConfig.gameplay, name: InputConfig.fire)

  override func update(deltaTime seconds: TimeInterval) {
    if fireAction.triggered {
      // Do something...
    }
  }
}
We grab a reference to the action we are interested in, then we use the game's update loop to check the state of that action.
As soon as some form of input device makes the input system trigger a fire action event, our condition will be true and we can run the code relevant for a fire action in out game.
If I'm more interested in getting the analog value for an action I can use
the getValue() method.
if let fireValue: CGFloat = fireAction.getValue() {
  print("fire:", fireValue)
}
Different input types return different value types. A .stick input will
return a CGVector while a .button input will return a CGFloat. The getValue() method
is a generic method, so we have to cast it to the type we expect the action to return.
Listen for Input Actions
Polling is nice and convenient to make quick tests or prototype things. In the end, listening to actions is what I most likely will use, which is also supported by the input system.
Each action can be assigned a delegate, so it's actually more or less dead simple to set up a listener.
class SomeComponent: Component {
  init() {
    Input.shared.getAction(map: InputConfig.gameplay, name: InputConfig.moveAction).delegate = moveDidChange
  }

  func moveDidChange(_ inputAction: InputAction) {
    let movement: CGVector = inputAction.getValue()

    // Do something with the movement value.

  }
}
We get a reference back to the InputAction when the action is triggered, so
we can cast and read the value and update our game state based on the input
value.
Switching Input Group
And finally, we are going to look at switching groups. As discussed earlier, we most likely are going to want to switch between UI input and gameplay input whenever we change between a gameplay state and the other states the game can be in.
I prefer to handle that with a state machine for my game states.
class PlayingState: GameSceneState {
  override func didEnter(from previousState: GKState?) {
    Input.shared.enableActionMap(name: InputConfig.gameplay)
  }

  override func willExit(to nextState: GKState) {
    Input.shared.enableActionMap(name: InputConfig.ui)
  }
}
In this example we change the input group each time we enter and exit the playing state of the game. Easy!
And that's all the code to get all the input setup in a game that I need. All the remaining code from dealing with game controllers to keyboards to actually handling input and interaction with devices, lives in my reusable Swift package.
Under the Hood
We have now looked at the concepts and ideas of how to make a rock-solid, decoupled and device-independent input system for games that is easy to interact with and setup from the game's codebase.
The actual inner workings that provide the different classes and value types we use are contained in my Game Input System Swift Package. To dive into the core of my library would be a bit too much for an article like this, we would turn it into a book.
Instead, I hope my walkthrough how I've set up my system. My thinking behind the different choices I made and how I interact with the system is enough so you can build an input system and fill in the blanks to build it in your own way with how you prefer to interact with your system.
And that my system can serve as a starting point to get your ideas flowing, and that you might get some insight to do things in ways you might not have thought of otherwise.
The Core Structure
My core structure is built around protocols and value types so I can easily extend it with new features and add new devices in the future.
The most important protocols, classes and value types that could be useful to consider if building an input system with a similar approach as I've done.
InputDevice: This is a protocol that provides the basic ins and outs to communicate with any kind of input device. So any new device type implements this protocol and makes it possible for the system to interact with the device. So any class likeGamepad,MouseorTouchadapts to this protocol and this is where the unique code is to translate between the device and the input system.InputBinding: Is a protocol that holds a reference to theInputActionit belongs to and is adapted by Input devices to provide the unique elements. This is the bridge to how the input device passes along an event to anInputActionso the event can be triggered for the game to use. We have things likeGamepadBindingandKeyInputBindingthat provide their own unique implementation to bridge between the device and the action.InputAction: This is the working class hero. This is where all device events end up; the values are processed and also transformed when necessary. For instance, there can be processing of input smoothing or calculation of analog values on digital-only devices based on time since triggered. This is where the game can query for current values and check the state of actions at any time.InputGroup: This value type organizes and toggles the actions associated with the group.
These four are the core functionality of the system. On top of them is the Input singleton
that makes it easy to interact with the package, and that's pretty much it.
Then there are quite a lot of additional code to handle special cases like laying out the virtual touch input controller and everything related to that.
Conclusion
Making the gameplay logic and algorithms is the easy part of game development. Making input systems is hard, but it pays off and is well worth the time to get it done right.
Then there's always the management of UI states... But that's a story for another day.