SpriteKit Safe Area
Handle the screen's safe areas with collapsing margins in a SpriteKit SKScene.

To ensure that no important elements are obstructed on devices with notches or curved corners, the screen's safe area values are available to help with the layout. When building an app with SwiftUI, AppKit, or UIKit, taking safe areas into account is quite simple and straightforward.
As the story usually goes with SpriteKit, it is not as simple out of the box, and we have to take a few extra steps to handle safe areas in a SKScene.
There are many ways to skin a cat, and here's the workflow I've come up with that has worked very well for my SpriteKit projects.
I try to avoid having to make different versions of my code for different devices as much as possible, and that philosophy also applies when it comes to safe areas. To cover any scenario, I like to add collapsing margins combined with the safe areas, to have the content placed where I want it on all devices without any other modifications.
When there is no safe area, we are going to want to use a margin between the screen's edge and the content. On devices with a safe area, the safe area will be used instead of the margin. Basically, we intend to collapse the margin with the safe area, to make the same setup work predictably enough on any device.
Let's study a few examples to narrow it down, we'll pretend that the circle shape represents an important HUD element that we want to place in the top left corner of the screen.
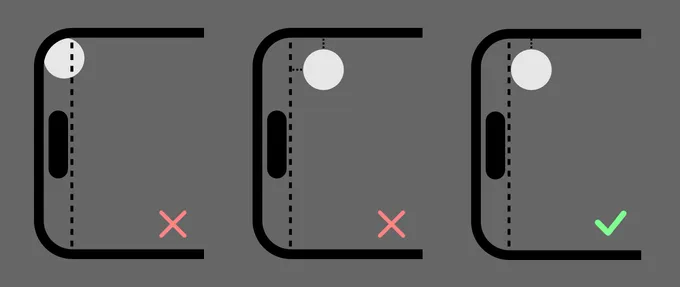
The version to the left illustrates what we'd get if we do nothing and just place the element in the top left corner. On a modern iPhone, a portion of the element will be obstructed by the rounded corner.
Most likely, we'd like to add a margin, and also use the safe area of the screen. If we were to put the element in a container with a margin for left and top edges, and then also use the safe area, we would end up with the middle scenario on a modern iPhone. We have a nice margin from the top, but on the left side we have both the safe area and the margin. In this case, it would most likely look the best to only use the safe area on the left side.
That leaves us with the version to the right, where the left margin is collapsed as there is a safe area, while we still use the margin on the top edge, as there is no safe area there.
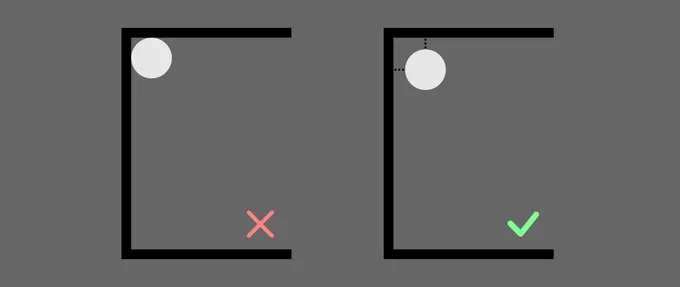
On a device with no safe areas, where the content would line up with the edge if we only used the safe area values, the margin will kick in on both the top and the left side.
SKScene Safe Areas
Before we get started, my workflow is based on the assumption that the SpriteKit scene adapts to the size based on the viewport, like I've lined out in a previous article, Multiple Aspect Ratios and Resolutions with SpriteKit. If you use another scaleMode for your projects, you might need to adjust accordingly.
With that out of the way, let's get down to business. The hosting view for the SpriteKit scene, SKView, provides a safeAreaInsets property that inherited from UIView. While this provides all necessary information about the device safe areas, the values are not directly usable, as a SpriteKit scene has its own coordinate system and then scaled inside SKView. To get something usable in SKScene we are going to recalculate these values.
For our convenience, let's extend SKScene and give it its own safeAreaInsets property. We are going to need a struct that can hold the SKScene specific values.
extension SKScene {
  public struct SafeAreaInsets {
    public let top: CGFloat
    public let left: CGFloat
    public let bottom: CGFloat
    public let right: CGFloat

    public static var zero: SafeAreaInsets {
      SafeAreaInsets(top: 0, left: 0, bottom: 0, right: 0)
    }
  }
}
This will allow us to have an API similar to the one provided via SKView, but with more relevant values for working with SpriteKit.
With the struct in place, we will have to figure out how much the SpriteKit SKScene has scaled in relationship to the hosting SKView. Let's add a property that calculates that information.
fileprivate var scaleFactor: CGFloat {
  guard let view = view else { fatalError("Scene has no hosting view") }

  return size.height / view.frame.size.height
}
We can now use the struct and the scaleFactor, to add the final property that will provide us with relevant safe area values for the SKScene.
public var safeAreaInsets: SafeAreaInsets {
  guard let view = view else { return .zero }

  return SafeAreaInsets(
    top: view.safeAreaInsets.top * scaleFactor,
    left: view.safeAreaInsets.left * scaleFactor,
    bottom: view.safeAreaInsets.bottom * scaleFactor,
    right: view.safeAreaInsets.right * scaleFactor)
}
If the scene has not yet been added to a view we return the shorthand static zero property of the SafeAreaInsets struct, else we multiply the view's safe area insets with how much the scene has scaled, to get safe area values that work as-is for the current SpriteKit scene.
To put it all together, we have ended up with this extension.
extension SKScene {
  public struct SafeAreaInsets {
    public let top: CGFloat
    public let left: CGFloat
    public let bottom: CGFloat
    public let right: CGFloat

    public static var zero: SafeAreaInsets {
      SafeAreaInsets(top: 0, left: 0, bottom: 0, right: 0)
    }
  }

  fileprivate var scaleFactor: CGFloat {
    guard let view = view else { fatalError("Scene has no hosting view") }

    return size.height / view.frame.size.height
  }

  public var safeAreaInsets: SafeAreaInsets {
    guard let view = view else { return .zero }

    return SafeAreaInsets(
      top: view.safeAreaInsets.top * scaleFactor,
      left: view.safeAreaInsets.left * scaleFactor,
      bottom: view.safeAreaInsets.bottom * scaleFactor,
      right: view.safeAreaInsets.right * scaleFactor)
  }
}
First Scene Gotcha
When the first scene is presented, SKView has not yet got the SafeAreaInsets and returns 0 for all edges. Once the view is displayed, the inset updates to the correct values.
For every following scene being presented, the view will have the correct values right away. If the first scene presented does not need to care about safe areas, it could likely be a loading scene where safe area play no part, then this gotcha is really nothing to care about.
In the case where the first presented scene needs to care about safe areas, that can be resolved by extending SKView.
extension SKView {
  override open func safeAreaInsetsDidChange() {
    scene?.didChangeSize(scene!.size)
  }
}
Once the system provides the app with the safe area values, safeAreaInsetsDidChange will be triggered in SKView. We hook in to that method to notify the presented scene about the change.
override func didChangeSize(_ oldSize: CGSize) {
  super.didChangeSize(oldSize)
  layoutScene()
}
In the presented scene, we can then use didChangeSize once the SafeAreaInsets becomes available, so the scene has a chance to do its positioning of elements there to ensure the layout for the first presented scene will look correct on all devices.
If the game supports both portrait and landscape mode, this should probably be handled in every scene to adjust the layout if the player rotates the device.
Collapsing Margins
Now, let's take a look at handling margins. Let's say that we have a player card that should be placed in the top left corner. To simplify things, let's say that we have set the anchor points of our scene to have the top left corner at (0, 0).
override func didChangeSize(_ oldSize: CGSize) {
  super.didChangeSize(oldSize)

  let leftOffset = safeAreaInsets.left
  let topOffset = safeAreaInsets.top

  playerCard.position = CGPoint(
    x: leftOffset,
    y: -topOffset
  )
}
By placing the card using the safe area values to offset the asset from the edges of the screen, we are ending up with this as a result.
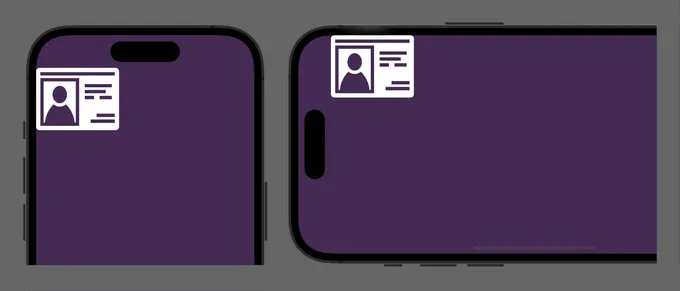
When we display the scene in portrait mode, we get an offset from the top of the screen, while we have no margin on the left side. When rotating the screen to landscape mode, we instead get an offset on the left edge of the screen, but we now have no margin at the top.
So what we want to do is this:
- Portrait mode: Left edge use margin, top edge use safe area.
- Landscape mode: Left edge use safe area, top edge use margin.
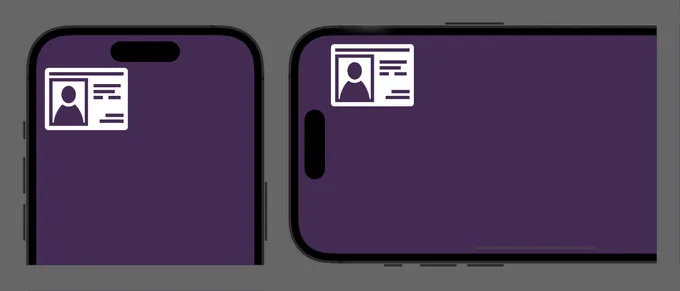
This can easily be accomplished by using max(), let's expand the layout code from before by adding a margin of 16.0 and then using max to collapse it with the safe area.
override func didChangeSize(_ oldSize: CGSize) {
  super.didChangeSize(oldSize)

  let margin = 16.0
  let leftOffset = max(margin, safeAreaInsets.left)
  let topOffset = max(margin, safeAreaInsets.top)

  playerCard?.position = CGPoint(
    x: leftOffset,
    y: -topOffset
  )
}
With this change we are ending up with something that looks much healthier where we have a margin kicking in when there is no safe area available.
Conclusion
I hope this approach can serve as a start to get a solid foundation for how to handle safe areas and margins for content living near the edges of the screen. See this as a starting point and spur ideas how to take this further to set up a layout and positioning system with SpriteKit. As a first next step, I can definitely see the collapsing of margins being automated into a property or method.