Trail VFX with SpriteKit
Create a common Game VFX with SpriteKit, useful for trailing effects like projectiles and magic. Based on the less used components SKCropNode, SKEffectNode, and SKWarpGeometryGrid.

Visual Effects are an important part of making pleasing effects in games. Commonly, VFX is used for things like bullets, projectile trails, magic, portals, and countless other things.
I was doing research some time ago on how to be able to replicate some common VFX techniques in SpriteKit. More specifically, I wanted to be able to make trailing effects to spice up the look of bullets as the player upgraded them while progressing through the game.
This is the kind of effect I ended up with, using only the functionality provided by SpriteKit.
Trailing VFX Breakdown
Let's start by breaking down how an effect like this is usually constructed, and then we continue on how to implement those techniques using SpriteKit.
The effect is based on having a seamless trail texture. This can be created in Photoshop quite easily with some random strokes and then matching up the edges with the offset filter to make it seamless. But that's out of the scope of this article.
Moving the Trail Independently
We are going to apply this texture on a plane, which is the VFX object that we will add to and move around in our game world. To make the texture feel dynamic instead of static, we are going to tweak the UV coordinates, which controls how the texture maps to the plane.
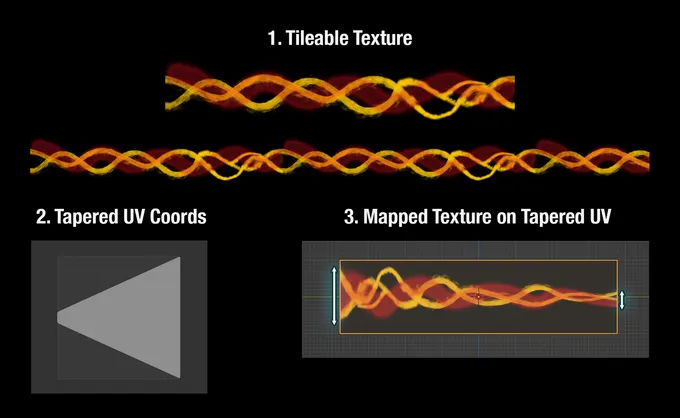
When we compress the V position of the coordinates on one edge of the UV, we effectively squeeze the texture located on the opposite edge, so we get a tapered effect on the texture from one edge to the other.
And here comes the beauty, if we move this plane over the scene, and at the same time we also move the U position of the texture, at a different speed than the plane is using, the texture "comes alive" and we get a sense that the texture constantly evolves and animates during its lifetime instead of just statically move over the scene.
Working with a UV like this, the possible effects can be taken much further. We could alter the UV using a curved shape instead of a linear falloff, or segment it up and randomly adjust each segment's size slightly to break up the movement and move it even further away from a static texture.
Fading Out the Trail Edge
Next, we are going to need to fade out the edge of the trail so it doesn't cut off abruptly. We will do that with the help of a gradient map.
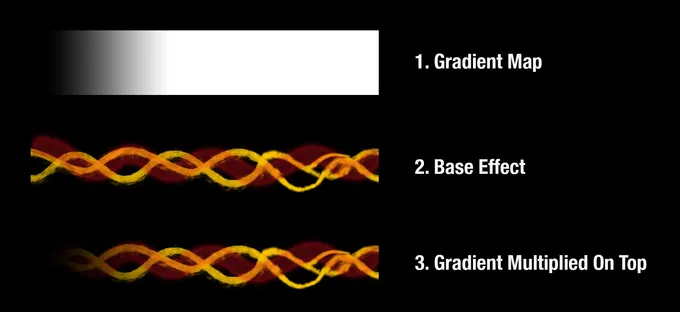
The gradient map is the top layer of the stack which we are using to control the opacity of the effect. This layer will remain in place and not move over the UV like the trail texture does. By doing a multiply blend of the top gradient layer with the layers below, we end up with a nice fade out at the edge of the trail.
Additional Tweaks
To give the trails a bit more flare and depth, we are going to duplicate the trail texture two or three times and stack them on top of each other. Each copy will have the texture slightly offset and move over the UV at a slightly different speed.
This gives us tons of dynamic variation as the effect moves over the game scene. In the video of my SpriteKit effect above, I've layered the trail texture two times and each layer moves with different speed values and is then blended together.
And for the final touch to make it glow, top it off with a bit of bloom.
SpriteKit Implementation
That was it for the theory and how one would achieve this kind of effect in most graphics and game systems. So let's see how we can approach this using SpriteKit and get into the nitty gritty details with some code.
The biggest challenge is that we don't have access to manipulate UV coordinates when we map textures to nodes in SpriteKit. With SceneKit it would have been a different story, but oh well. As game VFX is often heavily based on manipulating UVs, we have to come up with some workarounds to achieve similar outcomes.
The Trail Setup
The trail layer would usually rely heavily on manipulating UVs. As we don't have access to UVs in SpriteKit, let's see what we would need the UVs to do, and then find SpriteKit solutions.
- With UVs textures can easily be repeated, so when the texture leaves the surface on one edge, it wraps around, and comes in on the opposite edge.
- UVs allow us to compress and resize parts of the texture independently of how the displayed surface is sized.
As SKSpriteNode does not have functionality to move and wrap a texture applied to
it, we'll solve it by repeating the texture ourselves, parent the repeated setup to a container
node, and then crop out the visible area.
We'll have to handle the wrapping ourselves.
We will need three repetitions of the texture, which is enough no matter at what position we are observing it, to have enough repeating texture on each side to always be covered.
This setup will allow us to move the projectile texture independently of the parent node.
Let's begin with setting up the trail. I put this into it's own method so we can potentially create multiple layers of the same trail and stack for variation.
func makeTrail() -> SKNode {
  let trailC = SKSpriteNode(imageNamed: "trailTexture")
  let trailL = SKSpriteNode(imageNamed: "trailTexture")
  let trailR = SKSpriteNode(imageNamed: "trailTexture")

  trailL.position.x = -512
  trailR.position.x = 512

  let trails = SKNode()
  trails.addChild(trailC)
  trails.addChild(trailL)
  trails.addChild(trailR)

  return trails
}
We simply create the three instances we need of the texture. We have one centered, and then we move one to the left of it and one to the right of it.
In the example above, the texture is 512 points wide, so I've hardcoded the values
512 and -512 to move each segment to the left and right. We could have got this
value from the texture itself, to make it more reusable.
We then parent all the segments to an SKNode and return this hierarchy. This
trail object is basically what we need to be able to move and wrap the trail
texture independently.
Now we can call makeTrail() whenever we need a new trail to build and layer
up an effect.
override func didMove(to view: SKView) {
  // Get 2 wrapable trails.
  let trail1 = makeTrail()
  let trail2 = makeTrail()

  // Make the second trail slightly taller and change the blend mode to `add`.
  trail2.zPosition = 1
  trail2.yScale = 1.25
  for child in trail2.children {
    if let child = child as? SKSpriteNode {
      child.blendMode = .add
    }
  }

  // ... Setup continues ...
}
In this example we create two trail objects, so we can layer them on top of each other for more variation that will help sell the effect as a non-static texture.
The second trail object is made slightly larger by scaling it to 1.25 on the y-axis. The second
trail is placed
on top of the first, so each child of the second trail has its blendMode changed to add.
Move and Wrap the Texture
Time to get the texture moving. We will use the SKCropNode to get a window that
we can observe our trail object through, and then give the trail object that holds
the texture its own movement loop.
The crop node can then move around on the screen while the trail texture moves and wraps independently beneath it.
override func didMove(to view: SKView) {
  // ... Setup continued ...

  // Create a huge hidden background.
  // This is explained further in the taper part. We need this for the warpGeometryGrid.
  let bg = SKSpriteNode(color: .black, size: .init(width: 4000, height: 95))
  bg.zPosition = -1
  bg.isHidden = true

  // Mask with the crop node.
  let mask = SKSpriteNode(color: .red, size: .init(width: 400, height: 95))
  let crop = SKCropNode()
  crop.maskNode = mask
  crop.addChild(bg)
  crop.addChild(trail1)
  crop.addChild(trail2)

  // ... Setup continues ...
}
The huge background we create here is a story by itself that is related to SpriteKit's geometry warping behavior. So it will be explained further once we get to the taper section. We add it here as it needs to be a child to the crop node.
SKCropNode needs a mask that defines our cropping area. The mask is basically
our window where we can see what's inside the crop node, and the size of the mask
becomes the size of our effect. So the mask is of the same height as the
trail texture so we can fully see it, but much less wide, as we will keep moving
the trail texture and only want to see a part of it horizontally.
So after setting the mask, we just keep adding children (the trails and the background) that we want to see through the crop node.
override func didMove(to view: SKView) {
  // ... Setup continued ...

  // Keep moving the trails through the crop node.
  let move1 = SKAction.moveTo(x: 512, duration: 0)
  let move2 = SKAction.moveTo(x: -512, duration: 2)
  trail1.run(.repeatForever(.sequence([move1, move2])))
  let move3 = SKAction.moveTo(x: 512, duration: 0)
  let move4 = SKAction.moveTo(x: -512, duration: 2.5)
  trail2.run(.repeatForever(.sequence([move3, move4])))

  // ... Setup continues ...
}
We then need to move the trail texture. We use SKAction.moveTo(x:duration:) to
add the texture movement. Each trail needs two move actions. The first action has
a duration of 0 as it moves the texture back to its starting position. This is basically the wrap around.
And the second move action animates the texture to move to the other side of the visible area. The duration value here sets the speed. We put both move actions into a sequence that we repeat forever.
In this example we use two trails stacked on top of each other, so we move the second trail with a different duration to get a different speed so it adds visual variation.
Potentially, we could also offset the move x value for one of the trails for even more variation.
And there we have it, a parent node (the crop node) that can be moved in the game scene while a texture moves independently inside it that wraps around. This setup gives us the same behavior as the first of the two UV bullet points.
Fade the Edge
To fade out the edge of the effect, we will do pretty much exactly as theorized above. We'll take a gradient map image and multiply it on top of the effect.
override func didMove(to view: SKView) {
  // ... Setup continued ...

  let opacity = SKSpriteNode(imageNamed: "trailTexture-gradient")
  opacity.blendMode = .multiplyAlpha
  opacity.zPosition = 2

  // ... Setup continues ...
}
We prepare an object with the gradient texture and set its blendMode appropriately so we can fade out the edge of the effect. We will add the node to the effect hierarchy together
with the taper effect in the next step.
Another approach I've been considering is to use an SKShader that should be
able to do the same thing, but which would be cleaner and more efficient.
Taper the Texture
It's time to deal with the tapering of the trail effect by using a SpriteKit implementation for the second bullet point from the list with UV behaviors we are trying to replicate.
The closest I've got is to use an SKEffectNode with warpGeometry.
override func didMove(to view: SKView) {
  // ... Setup continued ...

  // The effect node to warp.
  let effect = SKEffectNode()
  effect.addChild(crop)
  effect.addChild(opacity)

  // Create the tapered coordinates.
  let destinationPositions: [vector_float2] = [
    vector_float2(0, 5),   vector_float2(0.5, 0.9), vector_float2(1, -2.5),
    vector_float2(0, 0.5), vector_float2(0.5, 0.5), vector_float2(1, 0.5),
    vector_float2(0, -4),  vector_float2(0.5, 0.1), vector_float2(1, 3.5)
  ]
  let warpGeometryGrid = SKWarpGeometryGrid(columns: 2, rows: 2)

  // Apply the tapered effect.
  effect.warpGeometry = warpGeometryGrid.replacingByDestinationPositions(positions: destinationPositions)
  // Control the quality of the distortion effect.
  effect.subdivisionLevels = 4

  // ... Setup continues ...
}
We distort the trail by using SKWarpGeometryGrid. Basically, we just create
a grid of coordinates where we can squeeze the right side of the node together, so when
the trail moves over the effect node, it gets compressed on the right side while
it spreads out and widens on the left side.
This approach works fine if used isolated, but as with many SpriteKit things, it gets a tad more complicated when combining parts together.
Use the subdivisionLevels property of the effect node to get rid of distortion blockiness
and get a much smoother and crisper look. Higher values do affect performance.
Do you remember this from before, when we created the huge background?
let bg = SKSpriteNode(color: .black, size: .init(width: 4000, height: 95))
bg.isHidden = true
Now is the time to talk about it. The huge, hidden, background is there to ensure that the warpGeometryGrid coordinates stay in put.
The warp does not respect the cropped area.
By having a larger than we need background, the warp will not move around. Otherwise, as the trails move over the node, it instead calculates the unit coordinates based on how large it sees all nodes added together for each frame. The large background counters that behavior and helps it keep consistent.
It's not a pretty solution, but that's how far I've been able to take it with SpriteKit alone. Using a CIFilter might be worth exploring as an alternative option, a transform there might behave more consistent than using warpGeometry.
Talking about CIFilter, as we have an effect node created already, why not keep using it.
override func didMove(to view: SKView) {
  // ... Setup continued ...

  // Add an additional bloom on top of the effect.
  let bloomFilter = CIFilter(name: "CIBloom")!
  bloomFilter.setValue(5, forKey: "inputRadius")
  bloomFilter.setValue(1, forKey: "inputIntensity")
  effect.filter = bloomFilter

  // ... Setup continues ...
}
The effect node can take a CIFilter among its properties, so let's go ahead and use it to add a bloom filter to enhance the effect further.
Move the Full Trail Effect
With the entire effect layered up and organized in a hierarchy under the effect node, we can now simply move the trail wherever we need it to be my moving the effect node around.
override func didMove(to view: SKView) {
  // ... Setup continued ...

  // Move the entire projectile over the screen.
  effect.run(SKAction.moveTo(x: 700, duration: 3))

  effect.addChild(crop)
}
And that's all there is to it. We start an animation where we want the projectile to go and then add it to the scene.
In this article I've out of convenience, just added the setup inside the didMove(to:)
method. It would make more sense to have this functionality in a trailEffect()->SKNode
method that would setup the trail and return its node to have it instantiated on demand.
The returned node can then get the appropriate movement action assigned and then added to the scene.
Performance wise using SKEffectNode and SKCropNode can be heavy. Keeping the dimensions down on the effect should have a positive effect on performance.
Next Steps
Even though the fact that this solution can not compete with what you can do with the modern game engines out there, and also that the solution uncovers a few flaws (aka bugs) with SpriteKit, it can still provide a lot of power and usefulness for SpriteKit projects.
A dynamic trail VFX can be the building block and foundation of many different effects. Continuing building on the trails in this example, I'll add a head to the trails using something like an animated flare. On top of that, a small particle emitter could be added as the final layer, emitted some sparkling texture to help bring the effect to life.